
In my previous posts I configured a pfSense VM to segment my home network and protect my house LAN from the possibility of a full takeover from an attacker. However, this had the opposite effect of making direct connection to these devices slightly harder. For most of my web services, the only way to connect to them is for me to enable a Double-NAT set up between my ISP router and pfSense:
flowchart TD
    Internet((Internet))
    ISP["ISP Router
"]
    PFSENSE["pfSense Router"]
    CADDY["Reverse Proxy"]
    APP["Application VM"]

    Internet -->|"TCP 80 / 443"| ISP
    ISP -->|"NAT forward
TCP 80 / 443"| PFSENSE
    PFSENSE -->|"NAT forward
TCP 80 / 443"| CADDY
    CADDY -->|"Reverse proxy
TCP 3000"| APP

    subgraph WAN["WAN / Internet"]
        Internet
    end

    subgraph ROUTING["Double-NAT Routing"]
        ISP
        PFSENSE
    end

    subgraph SERVICES["Virtualized Services"]
        CADDY
        APP
    end

    style Internet fill:#2d3748,color:#fff
    style ISP fill:#c05621,color:#fff
    style PFSENSE fill:#c05621,color:#fff
    style CADDY fill:#2b6cb0,color:#fff
    style APP fill:#276749,color:#fff
This configuration is good: however, there are a couple of security considerations to be made.
A couple of years ago I would’ve had no issue whatsoever towards keeping small, containerized services open to the Internet, assuming that the owner of said devices would stick to maintaining a strict update policy. However, I think that the advent of generative AI and LLMs kind of broke this assumption. It might just be confirmation bias or hype, but the last year has been a security nightmare as far as devastating CVEs go 1 2. We are not talking about unauthenticated RCE on some WordPress application (although we have plenty of that 3 as well), but straight-up kernel vulnerabilities that allow, among other things, full container escape onto the main host. My argument is that finding and patching vulnerabilities will become a cat-and-mouse game that is probably not worth playing. Automatic scanners already map publicly exposed services in search of vulnerable targets to infect with malware, and since it’s become much easier to find vulnerabilities in open source projects, I think it’s a good idea to add a layer of defense in depth which prevents my personal services from being indexed in the first place, using a VPN.
Tailscale, Headscale and Headplane#
To experiment a bit while adding this defense layer, I decided to go straight into the Tailscale rabbit hole, for two main reasons:
- The technology behind it, WireGuard, is very sound security-wise, and has been embedded in the Linux kernel for a couple of years already.
- At the same time, handling WireGuard certificates manually and ACLs along with it is not really the best thing to do on a summer evening. Tailscale is designed to simplify this exact part, trading off a bit of speed.
However, instead of using the standard Tailscale infrastructure I wanted to self-host it using a FOSS solution, which is named Headscale. Headscale implements certificate distribution, ACL distribution, a DNS server, and all the other features exclusive to Tailscale. It expects to receive connections on ports 80 and 443 for logins, and exposes a STUN server on port 3478.
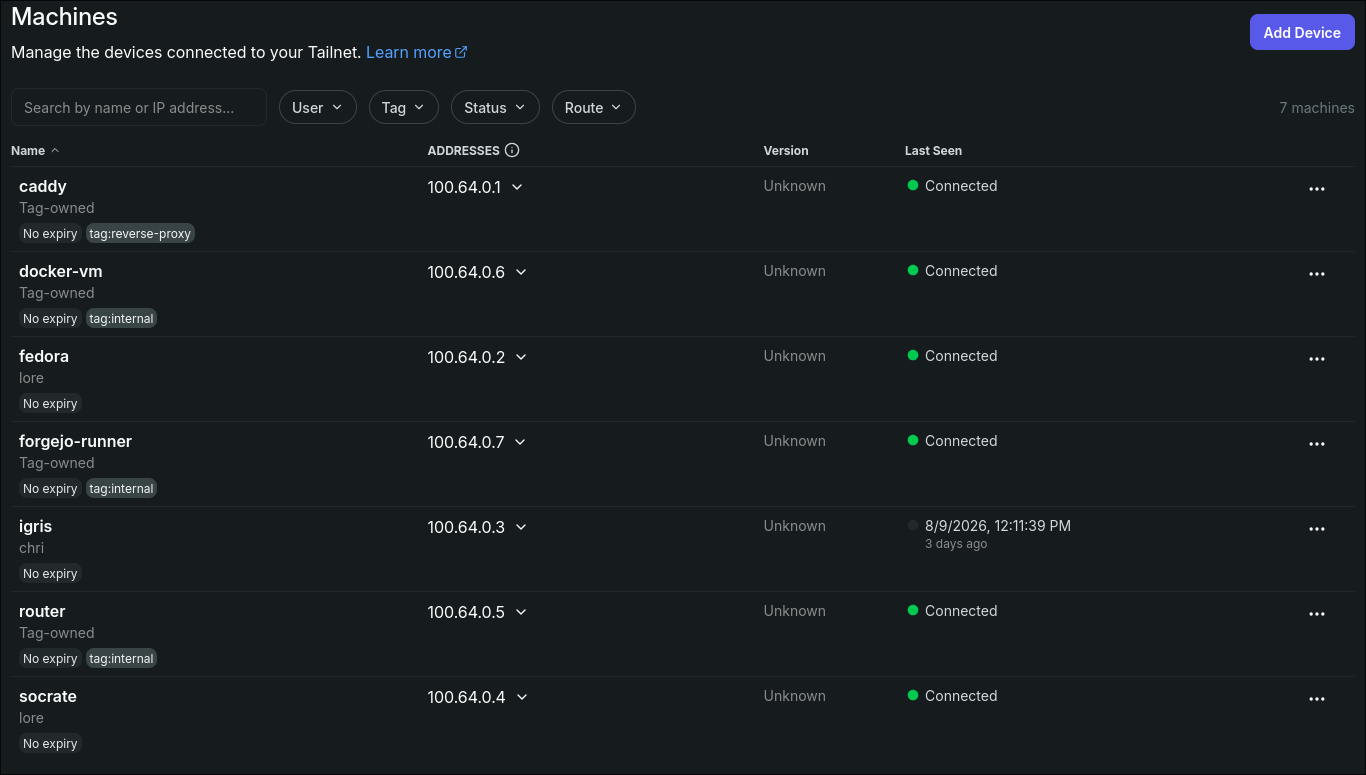
Additionally, I will host on the same machine as Headscale Headplane, which is a Web UI (also listening on port 80 and 443 under the /admin endpoint) that resembles as much as possible the Tailscale one, showing connected devices and applied configurations. The UI will be in read-only mode, meaning modifications to the Headscale server must be made via CLI.
The NAT Problem#
Before setting up Tailscale, I had to solve a problem that most people have when setting up WireGuard, which is bypassing NAT.
WireGuard is a P2P VPN: to establish a connection, each client has to individually be able to connect directly to all other clients in the network. This is what allows WireGuard to be so fast, but is also notoriously a source of trouble due to how the modern Internet manages connections between hosts.
The modern Internet is still based on IPv4, which has been running in a state of address shortage 6 for a couple of years: if each device was assigned an individual address, the Internet would be saturated very quickly and direct connections would become impossible. For this reason, modern ISPs and Internet providers adopted a strategy to map multiple hosts behind a single address, which is called NAT (Network Address Translation). NAT sits in between two clients trying to communicate, and is typically embedded in ISP modems. When A tries to reach B on port x, it uses the public address of the modem: if the modem has NAT set up for port x, it opens an ephemeral port on the internal network that is used to establish a direct connection between A and B:
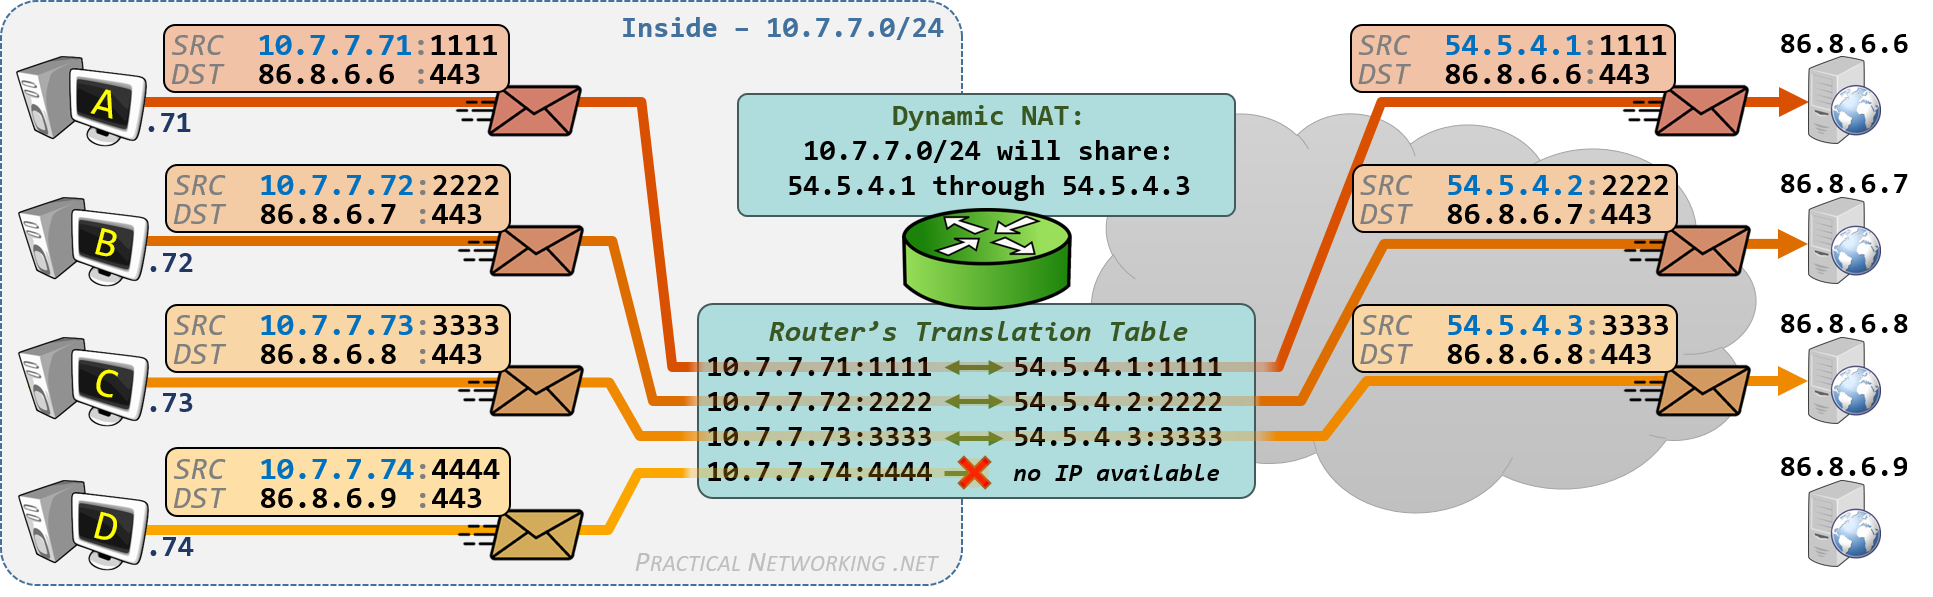
NAT solves the address shortage problem, because it allows mapping one address to, at most, 65535 internal hosts.
NAT is based on the concept of “states”: two internal hosts are allowed to communicate directly if a state of connection has already been established previously. This means that if a host tries to contact another prior to the establishment of a stateful communication, the NAT will drop the packet:
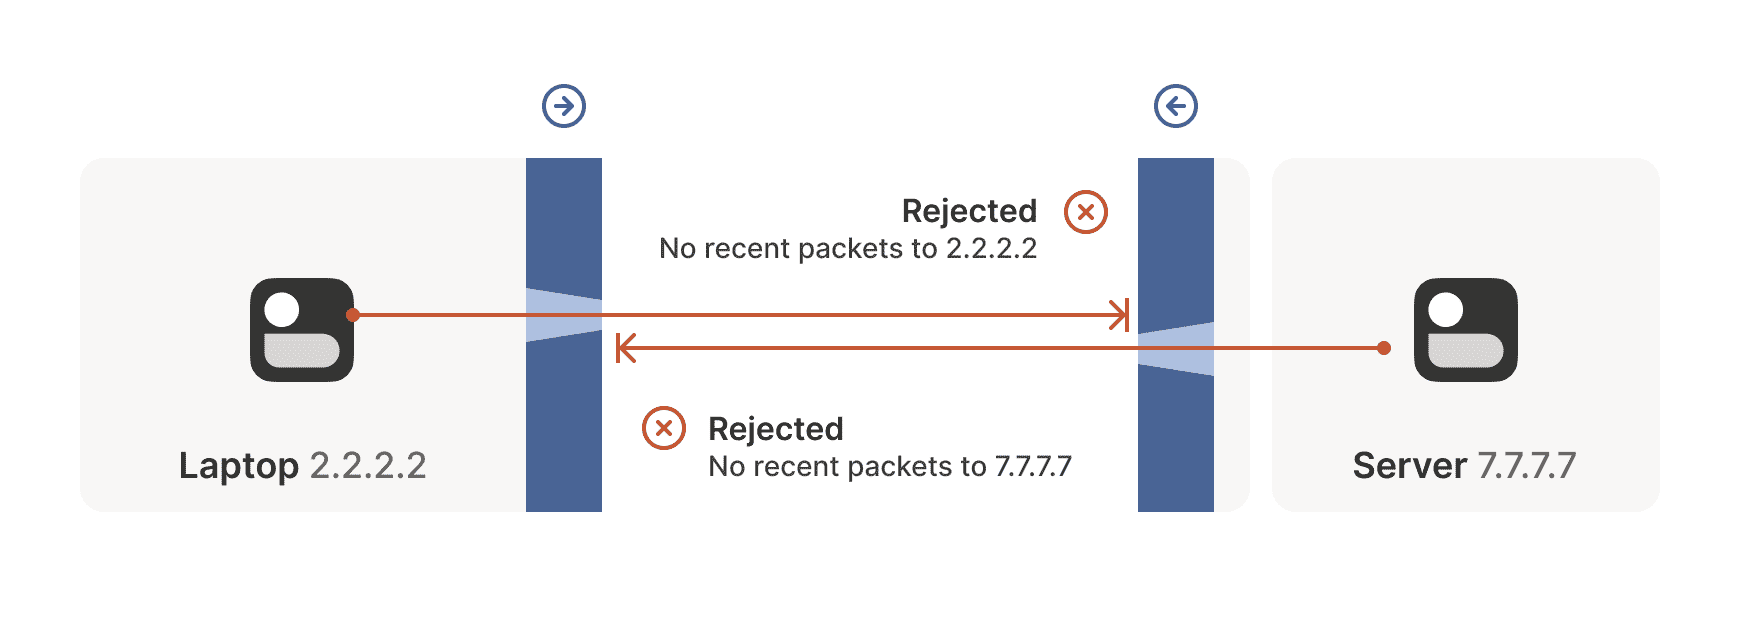
This, of course, is the biggest problem for P2P VPNs, because it effectively breaks direct communication. These NAT limitations made it necessary to develop a series of techniques to circumvent these problems and restore direct connectivity: this class of strategies is typically called “NAT traversal”
UDP Hole Punching#
The easiest bypass method for NAT is called “UDP Hole Punching”: most stateful firewalls do prevent direct connection if a connection has not been established previously, so client A tries first to communicate with B. The connection is dropped by B’s firewall, but A has opened a “hole” in its NAT, which can be used by B for future connections:
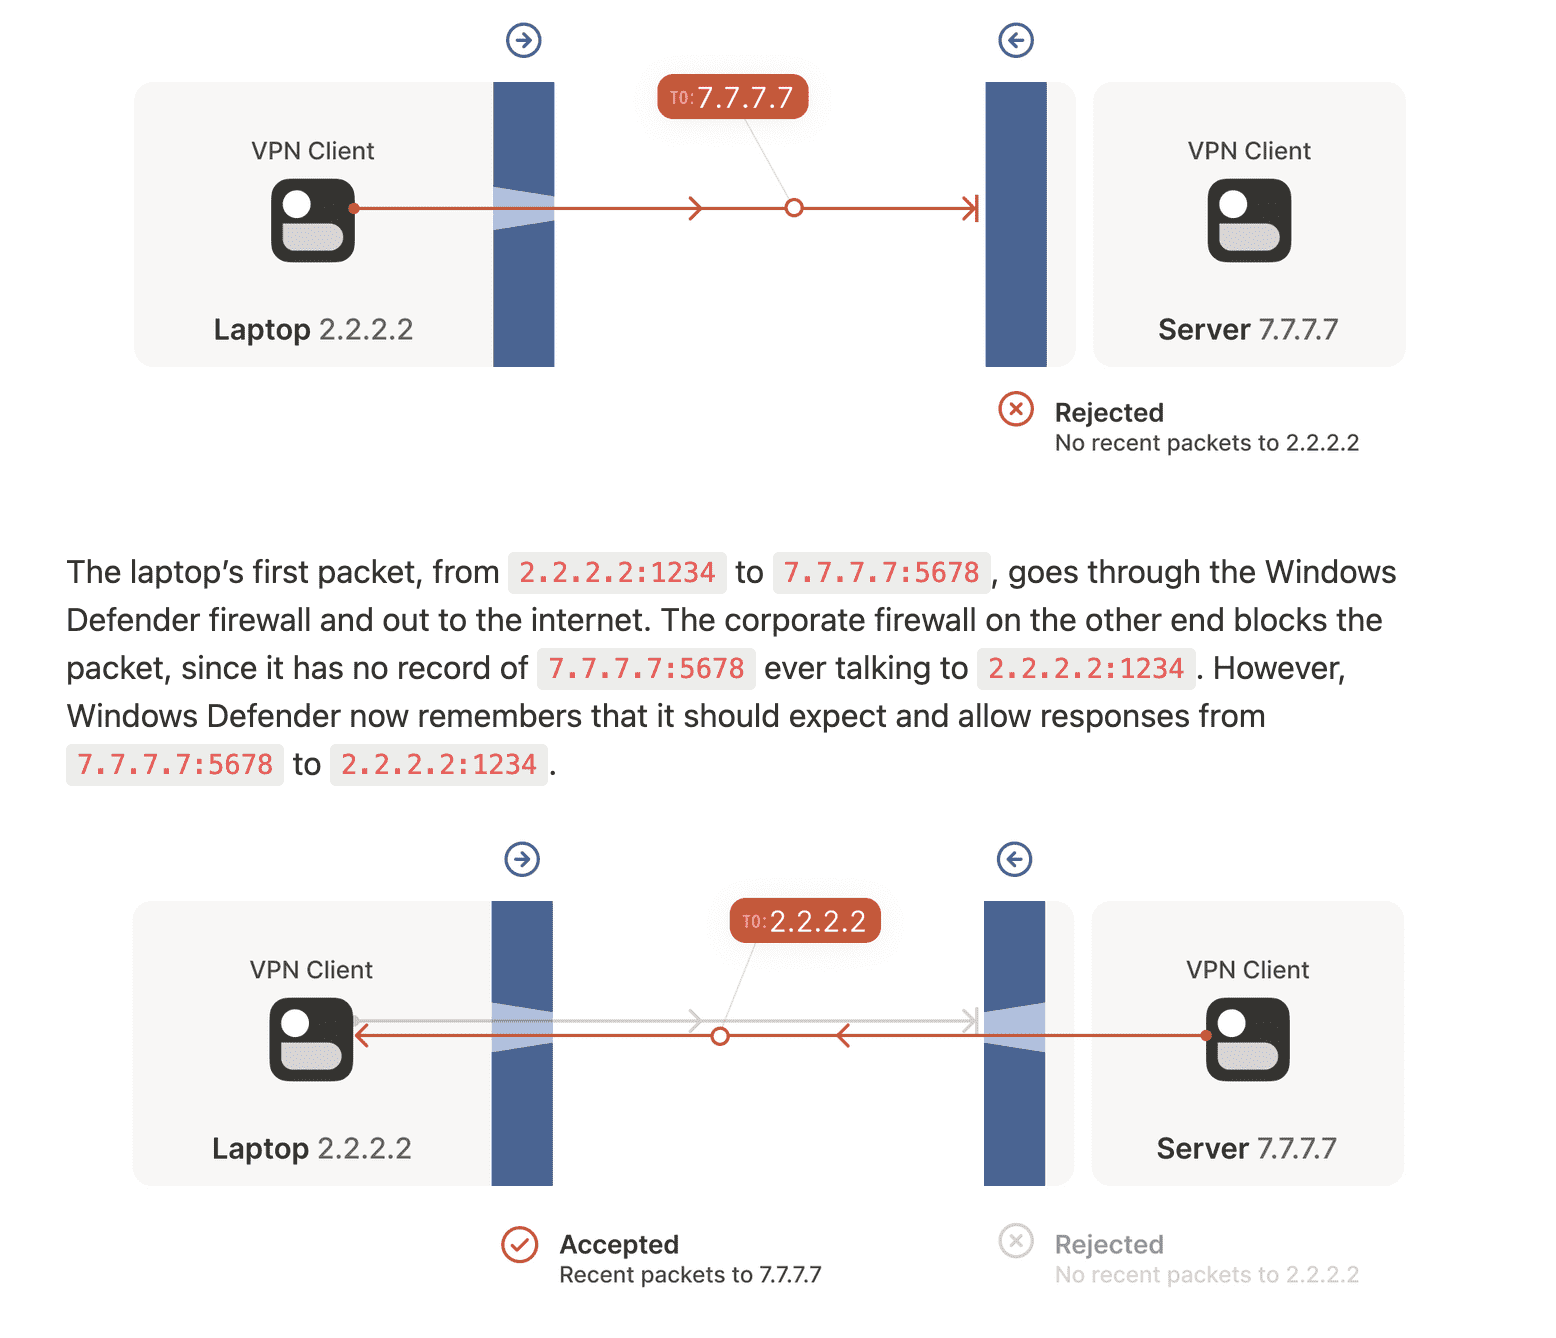
In order for A to see the “hole” it has opened in the firewall, it has to ask a third party to return its source IP as it is seen from outside the NAT. This protocol is called “STUN”, and the device responsible for giving A its “punched address” is called a “STUN server”.
Hard NAT#
UDP hole punching solves connectivity for devices that are under so-called “Full Cone NAT”. In these configurations, firewalls allow connections to the same NAT ip:port pair regardless of the destination address.
However, some routers and providers implement a different form of NAT, which is called “Symmetric NAT”: here, NAT addresses ip:port are mapped not only to the source ip:port, but to the pair (src ip:port, dst ip:port). This means that a single hole in the NAT cannot be used by any node wanting to communicate with A:
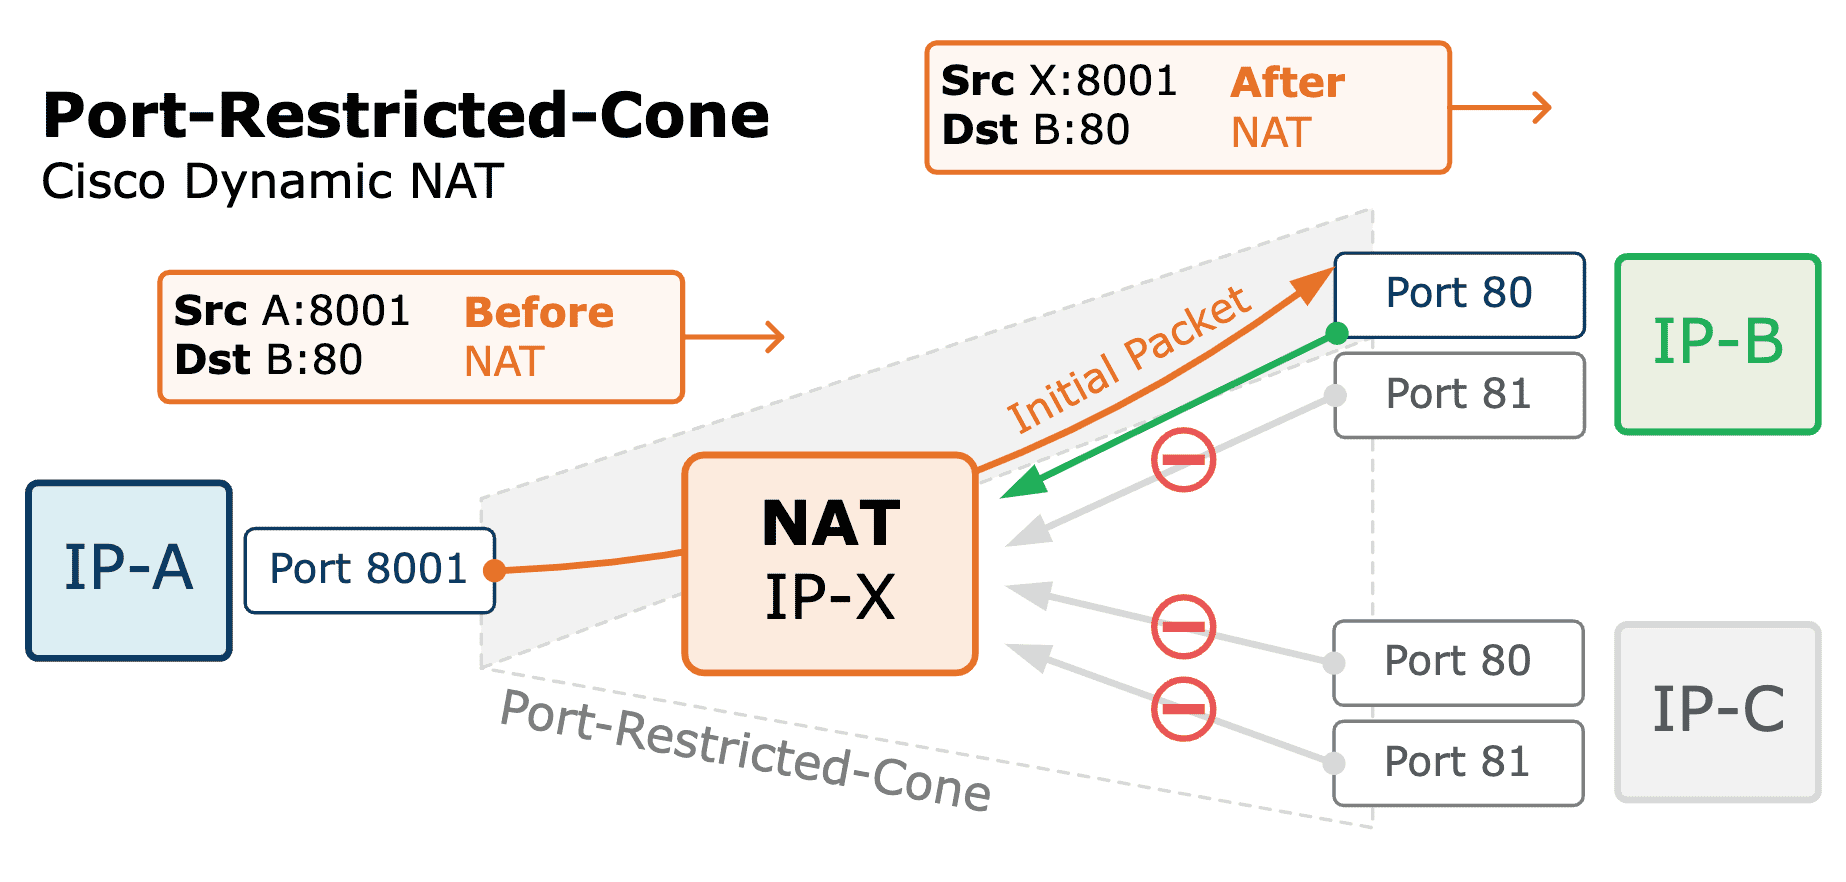
Hard NAT is how my router, pfSense, implements NAT policies 7. This means that, in order to allow direct connections, it is necessary to use one of the multiple strategies to traverse it.
DERP#
DERP is one of the most straightforward mechanisms to bypass NAT. It is a protocol invented by Tailscale itself, and is based on an older one named “TURN” 8. The TURN protocol receives packets from the outbound internet through NAT, and essentially re-routes them to registered nodes through their private address:
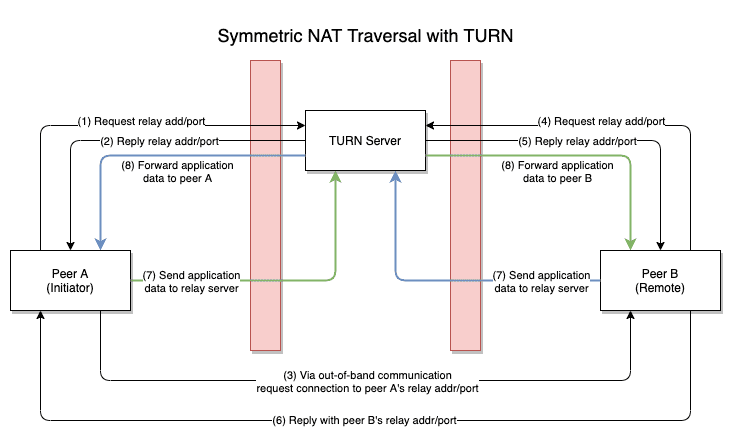
TURN improves on DERP by encrypting communications using WireGuard keys and routing traffic through HTTP(S): to make DERP work, all that’s needed is to map ports 80 and 443 of the router to the internal host with DERP, and packets will be routed successfully. This is easy to set up, but adds the delay of the communication forward which wouldn’t be necessary with direct connections.
Static NAT Port Mapping#
Another way to “soften” hard NATs is to implement “Static NAT port mapping”. By default, when pfSense routes traffic to the Internet, the source port is rewritten to masquerade internal ports of private services. This option can be disabled, allowing NAT traversal more easily
NAT-PMP#
NAT-PMP is a protocol which was born to solve the NAT issues in the easiest way possible. NAT-PMP, if enabled, allows LAN devices to temporarily open NAT rules, so that traffic can be routed to the internal host correctly following the specifications of the NAT:
Implementation#
I decided to allocate a singular LXC to host Headscale and Headplane on the same host. This way I can just NAT ports 80 and 443 to this host and allow connectivity.
OpenTofu LXC#
The container was created using OpenTofu:
# Download the pinned NixOS LXC template used by the Headscale container.
resource "proxmox_download_file" "headscale_lxc_template" {
  content_type = "vztmpl"
  datastore_id = var.proxmox-iso-pool-name
  node_name    = local.proxmox.node_name

  url       = var.headscale-lxc-template-download
  file_name = var.headscale-lxc-template-filename

  checksum           = var.headscale-lxc-template-checksum
  checksum_algorithm = "sha256"

  overwrite           = false
  overwrite_unmanaged = false
}

resource "proxmox_virtual_environment_container" "headscale_lxc" {
  description = "NixOS LXC running Headscale and Headplane."
  tags        = ["lancelot", "headscale"]

  node_name = local.proxmox.node_name
  vm_id     = var.headscale-lxc-id

  started       = true
  start_on_boot = true
  unprivileged  = true

  features {
    nesting = true
  }

  cpu {
    cores = var.headscale-lxc-cores
  }

  memory {
    dedicated = var.headscale-lxc-ram
    swap      = 0
  }

  disk {
    datastore_id = var.proxmox-disks-pool-name
    size         = var.headscale-lxc-disk-size
  }

  initialization {
    hostname = local.headscale.hostname

    ip_config {
      ipv4 {
        address = "${local.headscale_interface.address}/${local.headscale_interface.prefix_length}"
        gateway = local.docker_network.gateway
      }
    }

    dns {
      servers = local.docker_network.dns_servers
    }

    user_account {
      keys = [trimspace(var.headscale-lxc-ssh-pubkey)]
    }
  }

  network_interface {
    name    = "veth0"
    bridge  = local.proxmox.homelab_bridge
    vlan_id = local.docker_network.vlan_id
  }

  operating_system {
    template_file_id = proxmox_download_file.headscale_lxc_template.id
    type             = "nixos"
  }

  wait_for_ip {
    ipv4 = true
  }
}
Headscale Configuration#
The Headscale node is configured using NixOS to edit it declaratively. This setup requires configuring Headscale and Headplane separately.
headscale = {
  enable = true;
  address = "0.0.0.0";
  port = headscaleService.port;
  settings = {
    randomize_client_port = true;
    server_url = headscaleDomain;
    trusted_proxies = [ "${reverseProxyAddress}/32" ];
    policy = {
      mode = "file";
      path = headscalePolicy;
    };
    dns = {
      magic_dns = true;
      base_domain = "${homelabTopology.site.tailnet_subdomain}.${headscaleBaseDomain}";
      override_local_dns = false;

      # Create a DNS entry per private service as defined in the homelab's topology,
      # allowing them to be resolved via <service_subdomain>.<base_domain>.
      # To prevent Cloudflare from owning the DNS query, each domain is also added as a
       # split DNS entry, so that public records are not overridden by Tailscale
      nameservers.split = builtins.listToAttrs (
        map (service: {
          name = privateServiceDomain service;
          value = [ "100.100.100.100" ];
        }) privateServices
      );

      extra_records = map (service: {
        name = privateServiceDomain service;
        type = "A";
        value = reverseProxyVpnAddress;
      }) privateServices;
    };
    # This relay is appended to the public DERP map as a low-latency fallback.
    derp.server = {
      enabled = true;
      region_id = 999;
      region_code = "headscale";
      region_name = "Headscale Embedded DERP";
      stun_listen_addr = "0.0.0.0:3478";
    };
  };
};
Outside of the normal entries, this configuration defines two additional pieces required to make my Headscale setup work correctly: ACLs and DNS entries.
ACLs#
Tailscale ACLs are a security mechanism that allows the administrator of a Tailnet to set up a number of policies to limit communication between different clients. This is Tailscale’s implementation of something similar to a “firewall”: however, since WireGuard acts as a P2P VPN, its decentralized nature forces individual peers to drop/refuse traffic locally, at the decryption phase.
My ACL was configured in the following way:
- My personal devices are stored under the ownership of a user named “
lore”, and are given administrative status. These include my personal PC and my smartphone. - Internal services, like
caddy,gitand Forgejo’s runner are assigned a tag named “internal”. - The reverse proxy is assigned a special “
reverse-proxy” tag.
Then, the routing rules are:
- Administrative peers have access to all ports on
internalandreverse-proxydevices. - All members of the Tailnet can access
reverse-proxy’s exposed ports.
The policy can then be saved and loaded from a JSON file:
{
  "groups": {
    "group:admin": ["lore@"],
  },

  "tagOwners": {
    // Reverse proxies terminate Tailnet traffic for private services.
    "tag:reverse-proxy": ["group:admin"],

    // Internal devices can be administered directly over the Tailnet.
    "tag:internal": ["group:admin"],
  },

  "hosts": {
    "caddy": "@caddyVpnAddress@/32",
  },

  "acls": [
    // Tailnet members can reach private HTTP services and Forgejo SSH through Caddy.
    {
      "action": "accept",
      "src": ["autogroup:member"],
      "proto": "tcp",
      "dst": [
        "caddy:80",
        "caddy:443",
        "caddy:22222",
      ],
    },

    // Allow internal containers to reach Caddy
    {
      "action": "accept",
      "src": ["tag:internal"],
      "proto": "tcp",
      "dst": [
        "caddy:80",
        "caddy:443",
      ],
    },

    // Administrators can access every TCP port on tagged infrastructure.
    {
      "action": "accept",
      "src": ["group:admin"],
      "proto": "tcp",
      "dst": [
        "tag:reverse-proxy:*",
        "tag:internal:*",
      ],
    },

    // Administrators can also ping tagged infrastructure.
    {
      "action": "accept",
      "src": ["group:admin"],
      "proto": "icmp",
      "dst": [
        "tag:internal:*",
        "tag:reverse-proxy:*",
      ],
    },
  ],
}DNS#
By default, Tailscale ships a feature to manage DNS entries called MagicDNS. This option allows members of a Tailnet to access other peers using either:
- Their hostname as a DNS entry
- The fully qualified domain name, which consists of
<hostname>.<magic_dns_domain>
The MagicDNS domain is chosen by the administrator of Headscale, and the only constraint is that it must not be the same as the main Headscale server. For example, if my server is under lorecorrias.dev, one possible name for my MagicDNS entries might be tailnet.lorecorrias.dev.
While this configuration comes in very handy, I prefer allocating private DNS entries under my personal domain, which is lorecorrias.dev, without having to enter a longer domain. Doing this would normally require creating a separate, private DNS server, configuring entries manually and setting it as the Tailnet’s default server for domain queries. Luckily, Tailscale offers another feature to simplify DNS management by specifying some custom domains directly in Headscale:
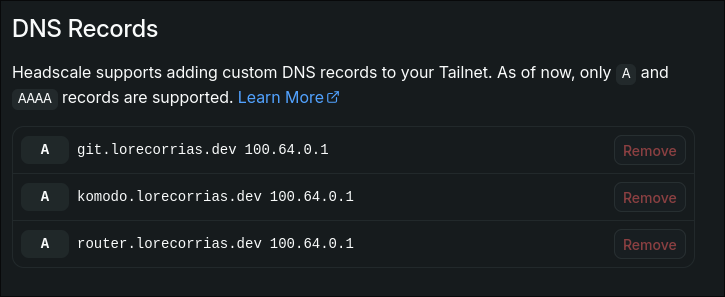
However, since my top domain is managed by Cloudflare, even if clients are connected to Tailscale and accept the DNS entries of the server (--accept-dns), the query will interrogate Cloudflare and not my Headscale DNS server. In order to overcome this issue, the Headscale server must be configured to add these entries to a split DNS 9 configuration. This allows Headscale to force the DNS server to use another server (in this case, 100.100.100.100 is Headscale’s DNS server address) instead of the owner of the top domain:
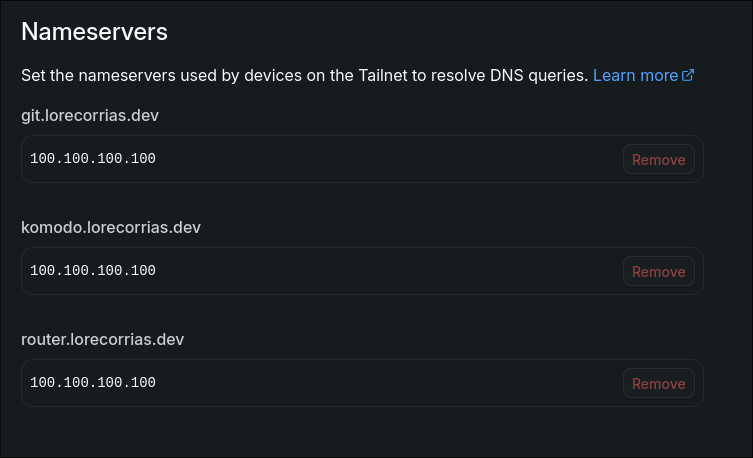
To simplify the management of DNS entries and private IPs, I decided to slightly edit my topology file. For each service, I added a “visibility” entry: if it is set to “tailnet”, then it is considered a Tailscale-managed service, and Headscale sets up a new DNS entry + split DNS taking the “subdomain” property of the service, pointing it to the reverse proxy’s VPN address (Caddy, which will be explained in the next post):
[services.komodo]
subdomain = "komodo"
host = "nixos_docker"
port = 9120
visibility = "tailnet"
In this example, komodo will be reachable from inside the Tailnet via komodo.lorecorrias.dev.
Headplane Configuration#
In the same Nix file as Headscale’s, I also configured Headplane, which acts as the public web UI to manage devices:
headplane = {
  enable = true;
  settings = {
    server = {
      base_url = headscaleDomain;
      host = localAddress;
      port = headplaneService.port;
      cookie_secret_path = config.sops.secrets."headplane/serverCookieSecret".path;
    };
    headscale = {
      url = "http://127.0.0.1:${toString headscaleService.port}";
      public_url = headscaleDomain;
      config_path = config.services.headscale.configFile;
      api_key_path = config.sops.secrets."headplane/headscaleApiKey".path;
    };
    integration.agent = {
      enabled = true;
    };
  };
};
Headplane had to be configured after Headscale, because the UI panel requires a Tailscale API key to visualize its configurations, which I loaded via SOPS. However, I decided to keep the UI as read-only, meaning that an administrator can only add devices and visualize configurations (ACLs and DNS). For now, I decided to also not set up OIDC to allow linking external accounts to Headscale. This means that, if I need to create a new user, I have to do it via the UI/CLI of Headscale, and then login with the API key.
NAT Traversal#
To conclude my Tailscale configuration, I implemented a couple of measures described earlier to permit NAT traversal of external devices to allow direct connectivity to other VPN peers.
DERP#
The first step to allow faster connectivity was to enable the DERP server. Tailscale serves a number of public DERP server, meaning that traffic would automatically be routed through the nearest DERP server even if one is not set up. This step is made mainly to speed up traffic:
derp.server = {
  enabled = true;
  region_id = 999;
  region_code = "headscale";
  region_name = "Headscale Embedded DERP";
  stun_listen_addr = "0.0.0.0:3478";
};
Additionally, pfSense must be configured to allow connections for the Headscale ports:

Now that direct connectivity is not possible, I can check that the ping uses the newly set up DERP server:
❯ sudo tailscale ping docker-vm
pong from docker-vm (100.64.0.6) via DERP(headscale) in 226msNAT-PMP#
To allow direct connections, I decided to enable NAT-PMP, which is the protocol I described above. This can be done by pfSense:
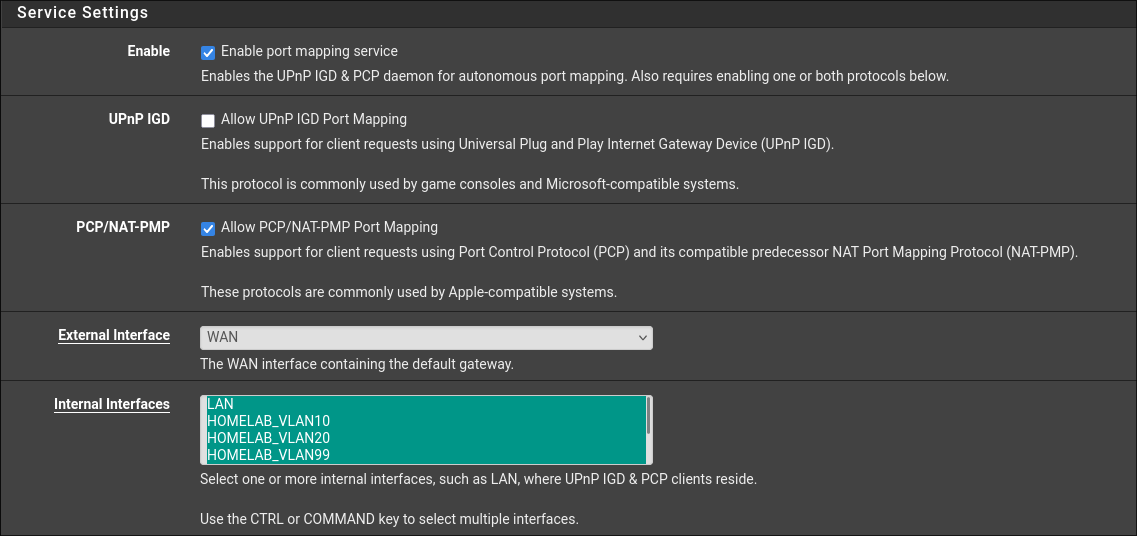
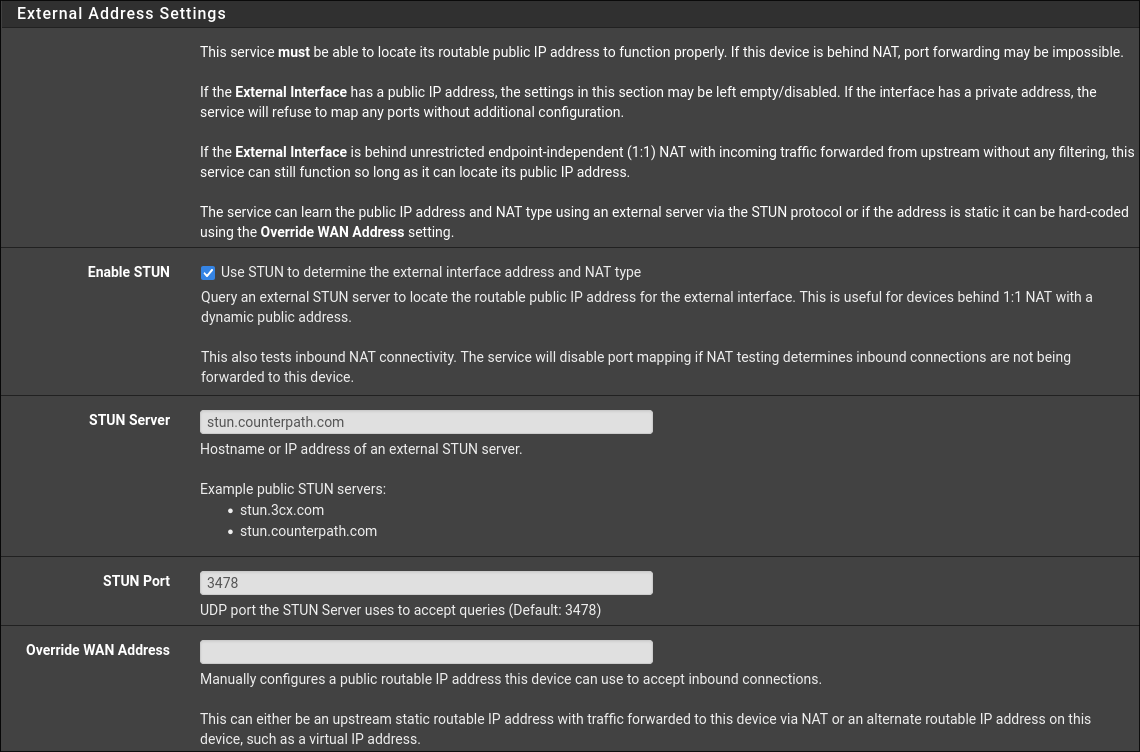
Also, since pfSense is behind my ISP’s router, I had to enable a STUN server. This is because pfSense has no idea what its IP is, as seen from other hosts outside the home LAN:
Finally, I also had to add an extra firewall rule to enable connectivity of hosts under VLANs towards the firewall’s UDP port hosting the NAT-PMP server:

If everything worked correctly, Tailscale should switch to direct connectivity after a couple of tries:
  ❯ sudo tailscale ping docker-vm
pong from docker-vm (100.64.0.6) via DERP(headscale) in 11ms
pong from docker-vm (100.64.0.6) via DERP(headscale) in 12ms
pong from docker-vm (100.64.0.6) via DERP(headscale) in 174ms
pong from docker-vm (100.64.0.6) via DERP(headscale) in 196ms
pong from docker-vm (100.64.0.6) via DERP(headscale) in 197ms
pong from docker-vm (100.64.0.6) via DERP(headscale) in 88ms
pong from docker-vm (100.64.0.6) via 101.59.86.207:38863 in 81ms

~ 7s
  ❯ sudo tailscale ping docker-vm
pong from docker-vm (100.64.0.6) via 101.59.86.207:38863 in 35ms
Connecting Clients#
Connecting individual clients depends, of course, on the architecture Tailscale is run on.
LXCs#
The only relevant thing to say was the configuration required to connect LXCs to Tailscale. That is because LXCs typically do not have permission to connect to /dev/net/tun, which is the device used by Tailscale to connect to the VPN in a system-wide mode. Bypassing this problem requires either turning LXCs into VMs, or allowing device passthrough. However, although the latter option is much easier, doing it requires operating as the root@pam user, meaning this option cannot be managed by OpenTofu, but manually from Proxmox’s UI.
Kindle(?)#
I read an interesting blog post from Tailscale10 which described how to connect a jailbroken Kindle to Tailscale. I followed the guide because it will be very useful in case I want to manage my e-books using Calibre or other similar clients.
Final Result#